go design (二) slice
golang 中如何去设计变长数组
我们在 谈论 slice 的时候到底在 讲什么?
go中 关于slice的结构定义
1 | |
指针指向元素数组的地址 、
len为实际数据的长度、cap为底层数组的长度所以 默认
cap >= len底层数组是可以被多个
slice同时指向的,因此对一个slice的元素进行操作是有可能影响到其他slice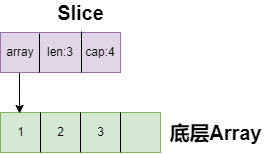
slice 的创建
在谈具体的 创建之前 必须要理解
nil slice与empty slice两种情况nil sliceempty slice的len与cap都是0- 但
empty slice其指针地址为0xc42003bda0所有的empty slice共享这个地址 - 而
nil slice默认是没有 指针地址 等同于nil - 所以官方默认推荐 为
nil slice
直接声明
1
2
3
4
5
6
7
8
9var s1 []int // nil slice
var s2 = []int{} // empty slice
fmt.Println(s1 == nil) // true
fmt.Println(s2 == nil) // false
marshal1, _ := json.Marshal(s1)
marshal2, _ := json.Marshal(s2)
fmt.Println(string(marshal1)) // null 注意 json 格式化时候的坑
fmt.Println(string(marshal2)) // []字面量
1
2s1 := []int{0, 1, 2, 5: 100}
fmt.Println(s1, len(s1), cap(s1)) // [0 1 2 0 0 100] 6 6- 特性 字面量支持 使用索引号,直接赋值
new
1
2slice := new([]int) // nil slice
fmt.Println(cap(*slice), len(*slice), *slice == nil)// 0 0 truenew返回的是对slice的引用 , 解引用之后的值为nil slice
make
make函数需要传入三个参数:切片类型,长度,容量[选填,默认等于长度]
1
2s := make([]int, 0) // empty slice
fmt.Println(s == nil) // falsemake会返回一个有初始值的类型, 所以 当len = 0时make出来的实际上是 一个empty slice
从切片或数组截取
1
2
3
4
5
6
7
8
9
10
11
12
13
14
15
16
17
18
19
20slice := []int{0, 1, 2, 3, 4, 5, 6, 7, 8, 9}
s1 := slice[2:5]
fmt.Println(s1, cap(s1), len(s1)) // 2, 3, 4 [8] [3]
s2 := s1[2:6:7]
fmt.Println(s2, cap(s2), len(s2)) // 4, 5, 6, 7 [5] [4]
s2 = append(s2, 100) // 不发生 数组 copy
fmt.Println(s2, cap(s2), len(s2)) // 4, 5, 6, 7 ,100 [5] [5]
fmt.Println(s1, cap(s1), len(s1)) // 2, 3, 4 [8] [3]
fmt.Println(slice, cap(slice), len(slice)) // 0, 1, 2, 3, 4, 5, 6, 7, 100, 9 [10] [10]
s2 = append(s2, 200) // 发生 数组 copy
fmt.Println(s2, cap(s2), len(s2)) // 4, 5, 6, 7 ,100,200 [10] [6]
fmt.Println(s1, cap(s1), len(s1)) // 2, 3, 4 [8] [3]
fmt.Println(slice, cap(slice), len(slice)) // 0, 1, 2, 3, 4, 5, 6, 7, 100, 9 [10] [10]
s1[2] = 20
fmt.Println(s1, cap(s1), len(s1)) // 2, 3, 20 [8] [3]
fmt.Println(s2, cap(s2), len(s2)) // 4, 5, 6, 7 ,100,200 [10] [6]
fmt.Println(slice) // 0, 1, 2, 3, 20, 5, 6, 7, 100, 9s := [low,high,max]low包含high不包含low <= high <= max <= 底层数组的capmax默认值为底层数组的 cap - lowmake生成的slice如果cap不为0,其申请了一个cap长度的数
append 到底做了什么
func append(slice []Type, elems ...Type) []Typeelems为不定参数append就是 向 原slice追加元素 ,也可以追加多个slice...实际上还是往底层数组添加元素但数组的底层大小是固定的,当加入的元素大于
cap时,slice会迁移到新的内存位置,新底层数组的长度也会增加。新
slice的容量预留了一定的buffer。但是 并不是 按照所谓的1024长度以前翻倍1024以后1.25倍 增长直到大于新的长度让我们来看下源码
1
2
3
4
5
6
7
8
9
10
11
12
13
14
15
16
17
18
19
20
21
22
23
24
25
26
27
28
29
30
31
32
33
34
35
36
37
38
39
40
41
42
43
44
45
46
47
48
49
50
51
52
53
54
55
56
57
58
59
60
61
62
63
64
65
66// 1.17.2 runtime/slice.go
func growslice(et *_type, old slice, cap int) slice {
// ......
newcap := old.cap
doublecap := newcap + newcap
if cap > doublecap {
newcap = cap
} else {
if old.cap < 1024 {
newcap = doublecap
} else {
// Check 0 < newcap to detect overflow
// and prevent an infinite loop.
for 0 < newcap && newcap < cap {
newcap += newcap / 4
}
// Set newcap to the requested cap when
// the newcap calculation overflowed.
if newcap <= 0 {
newcap = cap
}
}
}
// 根据实际分配的内存来 反推 cap
var overflow bool
var lenmem, newlenmem, capmem uintptr
// Specialize for common values of et.size.
// For 1 we don't need any division/multiplication.
// For sys.PtrSize, compiler will optimize division/multiplication into a shift by a constant.
// For powers of 2, use a variable shift.
switch {
case et.size == 1:
lenmem = uintptr(old.len)
newlenmem = uintptr(cap)
capmem = roundupsize(uintptr(newcap))
overflow = uintptr(newcap) > maxAlloc
newcap = int(capmem)
case et.size == sys.PtrSize:
lenmem = uintptr(old.len) * sys.PtrSize
newlenmem = uintptr(cap) * sys.PtrSize
capmem = roundupsize(uintptr(newcap) * sys.PtrSize)
overflow = uintptr(newcap) > maxAlloc/sys.PtrSize
newcap = int(capmem / sys.PtrSize)
case isPowerOfTwo(et.size):
var shift uintptr
if sys.PtrSize == 8 {
// Mask shift for better code generation.
shift = uintptr(sys.Ctz64(uint64(et.size))) & 63
} else {
shift = uintptr(sys.Ctz32(uint32(et.size))) & 31
}
lenmem = uintptr(old.len) << shift
newlenmem = uintptr(cap) << shift
capmem = roundupsize(uintptr(newcap) << shift)
overflow = uintptr(newcap) > (maxAlloc >> shift)
newcap = int(capmem >> shift)
default:
lenmem = uintptr(old.len) * et.size
newlenmem = uintptr(cap) * et.size
capmem, overflow = math.MulUintptr(et.size, uintptr(newcap))
capmem = roundupsize(capmem)
newcap = int(capmem / et.size)
}
//......
}- 所以 结论就是 slice 扩容规则是,
- 先是 估算 预期
cap传入值大于本身两倍时,等于传入值,其他情况 低于 1024 翻倍 高于 1024 逐步增加 1.25 倍直至 大于传入值 - 然后进行内存对齐算法计算
- 最终获取新的
cap值
- 先是 估算 预期
1
2
3
4
5
6
7
8// 验证内存对齐实例
s := []int{1, 2}
s = append(s, 4)
s = append(s, 5)
s = append(s, 6)// [5] , [8]
s1 := []int{1, 2}
s1 = append(s1, 4, 5, 6)// [5] , [6]s1原来只有 2 个元素,len和cap都为 2,append了三个元素后,长度变为 3,容量最小要变成 5,即调用growslice函数时,传入的第三个参数应该为 5。即cap=5。而一方面,doublecap是原slice容量的 2 倍,等于 4。满足第一个if条件,所以newcap变成了 5
1
2
3
4
5
6
7
8
9
10
11
12
13
14
15
16
17
18
19
20
21
22
23
24
25
26
27
28
29
30
31
32
33
34
35
36// 根据 内存对齐的判定 走到 第二个判定
capmem = roundupsize(uintptr(newcap) * sys.PtrSize)
overflow = uintptr(newcap) > maxAlloc/sys.PtrSize
newcap = int(capmem / sys.PtrSize)
// sys.PtrSize 在 64 位 机器上为 8
uintptr(newcap) * sys.PtrSize = 5 * 8 = 40
// 所以相当于 调用了 roundupsize(40)
// runtime/msize.go
_MaxSmallSize = 32768
smallSizeMax = 1024
smallSizeDiv = 8
size = 40
func roundupsize(size uintptr) uintptr {
if size < _MaxSmallSize {
if size <= smallSizeMax-8 {
return uintptr(class_to_size[size_to_class8[divRoundUp(size, smallSizeDiv)]])
} else {
// ......
}
}
//......
}
// 所以最终 调用的是
class_to_size[size_to_class8[divRoundUp(size, smallSizeDiv)]]
// runtime/stubs.go
func divRoundUp(n, a uintptr) uintptr {
// a is generally a power of two. This will get inlined and
// the compiler will optimize the division.
return (n + a - 1) / a
}
divRoundUp(size, smallSizeDiv) = (40 + 8 -1) / 8 = 5
size_to_class8[5] = 5
class_to_size[5] = 48
//最终
newcap = int(capmem / sys.PtrSize) = 48 / 8 = 6- 所以 在经过 内存对齐 算法后 新的
cap为 6 而不是想象中的 8
- 所以 结论就是 slice 扩容规则是,
为什么 nil slice 可以直接 append?
- 其实
nil slice或者empty slice都是可以通过调用 append 函数来获得底层数组的扩容。 - 最终都是调用
mallocgc来向 Go 的内存管理器申请到一块内存,然后再赋给原来的nil slice或empty slice,然后摇身一变,成为“真正”的slice了。
传 slice 和 slice 指针有什么区别
slice与slice指针 都是值传递,只不过是copy了一份 同样的结构,但是底层都是指向同一个数组不改变底层数据的情况下是不会对 原始
slice产生影响
1 | |
- 当
append元素后 新len不超过cap时, 会公用底层部分的slice
1 | |
copy 函数的小坑
func copy(dst, src []Type) int将src的值 拷贝给dst,dst必须先确定好新len跟cap,多于dst.len的 值 会被忽略。copy是slice专用数据复制函数。默认是值进行复制,不是引用复制 用nil slice跟empty slice进行赋值是没意义的,因为多余的值被忽略,你永远也赋值不进去
go design (二) slice
https://blogxy.cn/posts/efa6eb50/
